Tutorials
Make a Bootable Internal/External Hard Drive Partition and Install Windows from it
Step 1: Format the Drive
Just place the flash drive in the USB port of your computer. Open command prompt (cmd). You can do that by pressing WINKEY+R and typing "cmd" or searching and right-clicking on the listed file and clicking on “Run as administrator“.
Have in mind that this will format the Hard Drive. If you do not want to lose all your files, simply create a partition with something close to 8GB (for Windows 10 installation, for instance) and skip this step.
Otherwise, enter the following commands in the same order as I did here:
diskpart
list disk
select disk z (where z is the number corresponding for your USB disk. You have to replace it with the corresponding letter from your own system).
clean
create partition primary
active
format fs=fat32 quick
assign
exit
list disk
select disk z (where z is the number corresponding for your USB disk. You have to replace it with the corresponding letter from your own system).
clean
create partition primary
active
format fs=fat32 quick
assign
exit

Please be careful using the select command (so you don’t select and format your hard disk instead)

If everything goes well, this is how your cmd screen will look like
Step 2: Mount The Windows 8 ISO Image Into A Virtual Drive
If you don’t have a physical optical drive you should mount the image into a virtual drive. You can install and use PowerISO. For Windows 8 and up, this function is already natively included in the system, just click the .ISO file.
Step 3: Make The External Hard Disk Bootable
I’m assuming that F is your drive letter with Windows 8 ISO image and G: is the location of your external hard disk (or flash drive) . Open the command prompt screen (as administrator) and type the commands:
F:
cd boot
bootsect.exe /nt60 g:
cd boot
bootsect.exe /nt60 g:

Also, don’t forget to triple check the target location so you don’t accidentally delete the boot sector of your hard disk
Step 4: Copy The Installer Files
After the above step, don’t close the command prompt (at least not yet). At this moment your new external hard disk or flash drive is bootable but you need to execute one more command in order to transfer the files to your new drive. You have to type the following command line:
xcopy f:\*.* g: /e /f /h
Again replace the drive letters with the ones that apply to you. Alternatively you can copy all the files in the virtual drive to the flash drive or external hard drive by using Windows Explorer, but using XCOPY ensures that system and hidden files are also copied.
Step 5: Boot Off The External Hard Drive or USB Flash Drive
To use and boot from your newly created drive on your netbook or computer, first you have to set your computer you must set it to boot through the USB flash drive. In order to do this shut down your computer, go in the CMOS setup by pressing the “DEL” or “F2″ key when the computer power on, without unplug the newly created external hard drive or USB Flash Drive from the machine. Set the device as the primary boot option, save the changes BIOS and restart. On newer computers you can boot from the device without entering into BIOS by pressing either “ESC”, “F9″ or “F11″ (different key on different manufacturers).

Now you can install Windows as usual. Please be aware that if you’ve changed the boot sequence in the BIOS, remember to change it back as it was after copying the files (usually after first automatic reboot).
If it does not boot, showing a message of the kind "Insert a boot media in selected device and press any key", that is because the partition is not currently bootable. Either access 'diskpart', select the partition and type "active", or, if that returns any error, proceed to a different approach: WinToHDD.
Step 1. Run WinToHDD, then click the  button.
button.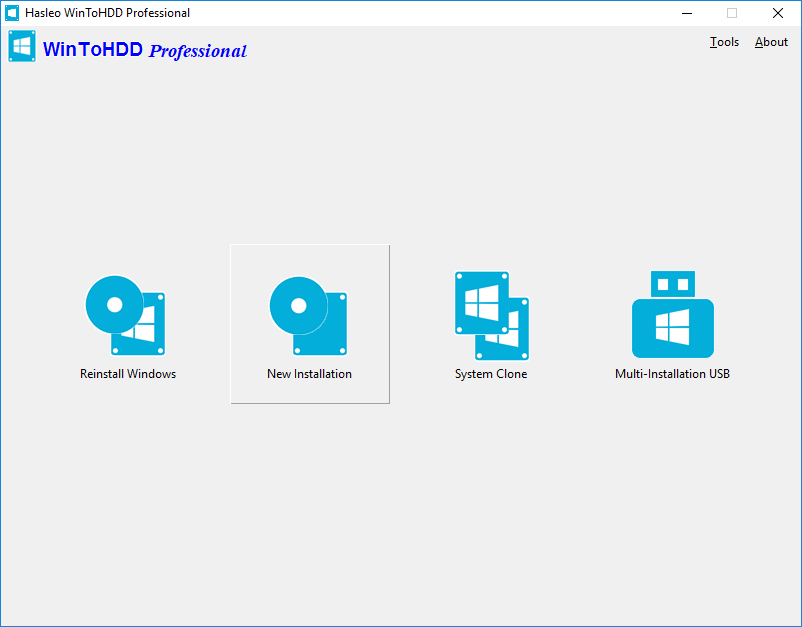
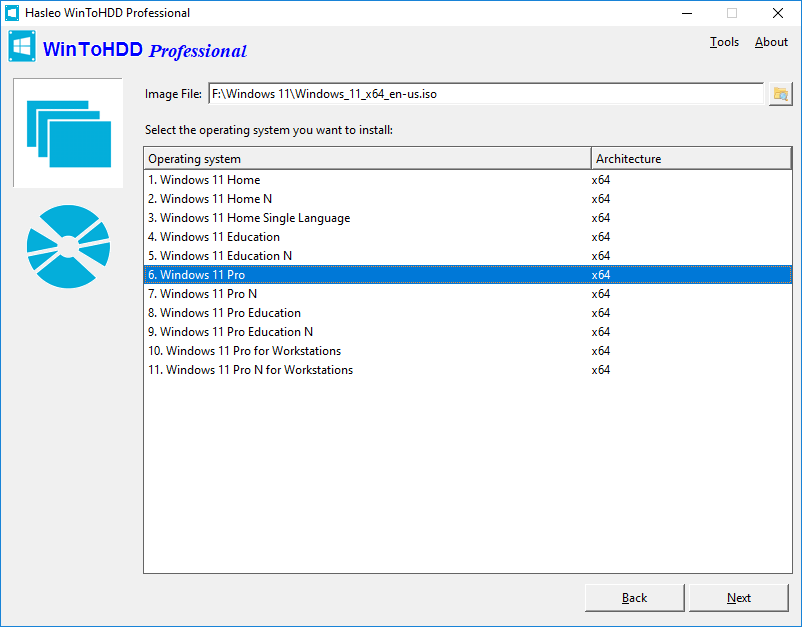
Step 2. Please use the following guidelines to prepare your installation source.
- Installing from an ISO/WIM/ESD/SWM/VHD/VHDX File: Click the
 button, then click the
  button and select the ISO/WIM/ESD/SWM/VHD/VHDX file from the open dialog box.
 - Installing from a DVD drive: Insert the Windows installation CD/DVD into your CD/DVD drive. Once the CD/DVD is being detected in Windows, then click
 button and select the CD/DVD drive in the drop-down list. If your CD/DVD drive is not correctly recognized by WinToHDD, you need to click the
  button for the program to recognize the CD/DVD drive.
Step 3. WinToHDD scans for and lists installable operating systems. If you see the edition of Windows you want to install, select it, then click "Next".
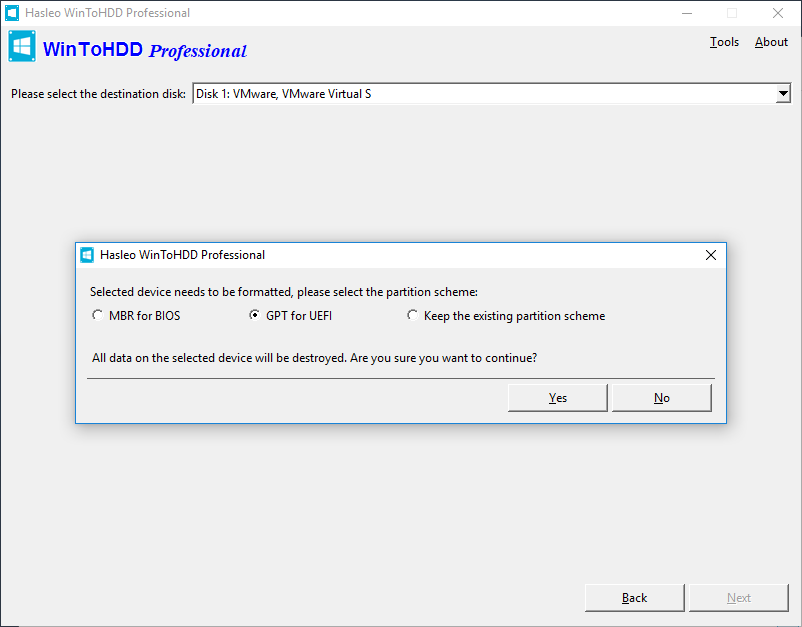
Step 4. Select the destination disk in the drop-down list, a pop-up will appear asking you if you want to format it to continue, select the partition scheme you want to use and click "Yes" to format it. If you do not want to lose all your data, choose "Keep the existing partition scheme", then you need to manually prepare the partitions on the disk, and here is the user guide on how to manually prepare partitions for the destination disk.
Step 5. Select the system partition (for UEFI, FAT-32 100MB) and boot partition (the normal Windows partition. For UEFI, NTFS) from the partition list; the selected partitions will be marked as red.
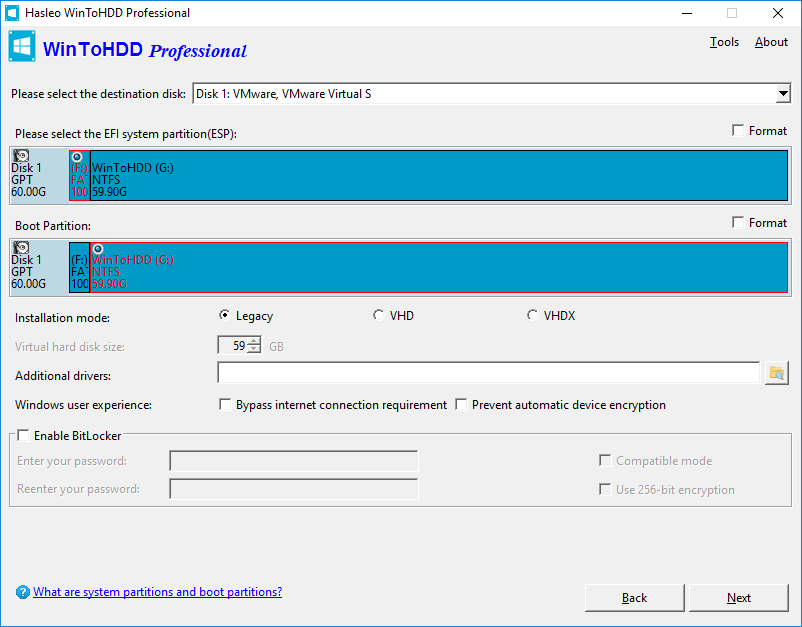
Step 6. Click "Next". After clicking "Next", WinToHDD begins installing Windows.
Step 7. It takes some time to install. After installation restart the computer and change BIOS to boot from your hard disk drive.
Step 8. Windows installation starts up and you have to complete all the installation steps. You will have to boot from your hard disk drive if the Windows Installation restarts the computer.
That is it! You are all set up!
--------------------------------------------------------------------------------------------------------------------------
How to install Mac OS on a normal Windows computer (without needing a Mac) - Hackintosh
- Hackintosh Catalina Requirements
- An existing computer with Windows, Linux or Mac: This is the computer where you will download and set up Niresh Catalina. The computer can run either Windows, Linux or macOS; any operating system will work.
- A Hackintosh-compatible computer with an empty hard drive: This is the computer where you will install Hackintosh Catalina. It can be the same computer as the one mentioned in the previous point. If your computer already has macOS installed, Niresh Catalina will just update macOS normally, without deleting any of your apps or files, but a fresh installation is always recommended. MacOS needs its own hard drive partition — a minimum of 15 GB of space is required, but at least 50 GB of space is recommended. It is preferred that you use a completely empty hard drive for Installing Niresh Catalina.
- Niresh Catalina (Free): Niresh Catalina is a distro of macOS Catalina that has been modified to work with PCs. You will need to use a Bittorrent client to download the disk image file containing Niresh Catalina, which is a little less than 6 GB in size. You must register on the Hackintosh Zone website to be able to download anything. DOWNLOAD.
- An empty USB drive (8 GB or larger): In this guide, you will write (port) Niresh Catalina onto a USB drive, and boot your computer from that drive to install macOS Catalina. The USB drive must be at least 8 GB in size. Since you will need to erase all of the files on the USB drive, make sure to back up its contents first. You can reuse this USB drive for normal stuff after you finish installing Catalina.
- TransMac: ($48, 15-day free trial): If you are using a Windows computer to set up Niresh Catalina, you need to use TransMac to write the disk image file onto your USB drive. You can just download the free trial. DOWNLOAD.
- Metal Supported Graphics Card: Metal is the foundation for accelerated graphics and computing on Apple platforms, enabling your apps and games to tap into the incredible power of the GPU. Catalina requires metal compatible Graphics Card to have full graphics acceleration on macOS. But Metal is not necessary to Install macOS.
Here is the list of Nvidia Cards that are Natively Supported with Catalina.
GTX Titan | GK 110
GTX Titan Black | GK 110
GTX Titan Z
GTX 780 Ti
GTX 780
GTX 770
GTX 760 Ti
GT 740
GT 730
GT 720
GT 710
GTX 690
GTX 680
GTX 670
GTX 660 Ti
GTX 650 Ti
GTX 645 (Fermi)
GT 640 (Kepler edition, GK 107/208 core)
GT 630 (Kepler edition, GK 208 core)
Quadro 410
Quadro K420
Quadro K600
Quadro K2000/D
Quadro K4000/D
Quadro K4200
Quadro K5000
Quadro K5200
Quadro K6000
Quadro NVS510
- Create your Hackintosh Catalina Bootable USB drive.
Creating Hackintosh Catalina Bootable USB from Mac.
Follow this step if you are setting up Niresh on a Mac or existing Hackintosh. Plug your USB drive into Mac, and open Disk Utility (located in Applications->Utilities in your main hard drive). Select your USB drive in the sidebar of Disk Utility and erase the drive, with the “Format” set to “Mac OS Extended (Journaled)” format. You can rename the drive any way you want.Select the main USB Device, “USB DISK 3.0 Media” as in the example.

Erase USB as “Mac OS Extended (Journaled) format” & as “GUID Partition Map” Scheme.

If you’re using a Mac to set up Niresh Catalina, you need the “Restore Catalina” app to write the disk image file onto your USB drive. Again, you must register on the Hackintosh Zone website to be able to download anything.
Next, make sure that your Niresh Catalina disk image file is in the same folder as “Restore Niresh Catalina.pkg”. If “Restore Niresh Catalina.pkg” is still in a ZIP file, double-click that file to unzip it.
Double click on “Restore Niresh Catalina.pkg” to start the app. By default, the app will be aimed at your computer’s main hard drive (mine is named “Mac” in the picture above). You do not want this; instead, click through the installer until you reach the page with the “Change Install Location” button.
From here, change the install location of the app to your USB drive.
Press the enter/return key. The app will ask for your system password. After you enter your password, it will begin writing the Niresh Catalina disk image onto the USB drive.
This will probably take 20-40 minutes, though it may take longer, depending on the speed of your USB drive & Computer. Once it finishes, your USB drive will contain a fully bootable version of the Hackintosh Catalina installer.
NOTE: “Restore Niresh Catalina.pkg” is very glitchy. If you can not find the “Change Install Location” button on the first time that you run the app, restart your computer and re-run the app.
Creating Hackintosh Catalina Bootable USB from Windows.
Follow this step if you are setting up Niresh Catalina on Windows. Plug your USB drive into your computer, and open TransMac. Find your USB drive on the left-hand column of the TransMac window.Right-click on the USB drive, and click “Format Disk for Mac”. This will delete all of the files on your drive and prepare it for macOS Catalina.
Once your USB drive is done formatting, right-click it again and click “Restore with Disk Image”.

A file selection window will pop up, Choose your Niresh Catalina disk image file (it will probably be called “Niresh-Catalina.dmg”), and proceed. Now, TransMac will write Niresh Catalina onto your USB drive.
This will probably take 20 to 40 minutes, though it may take longer, depending on the speed of your USB drive. Once TransMac finishes, your USB drive will contain a fully bootable version of the Hackintosh Catalina installer.
Creating Bootable Niresh Catalina USB from Linux.
Preparing Catalina bootable USB from Linux is tricky, First, you have to uncompress the .dmg file, then write it to USB.Install DMG2IMG with YUM or APT-GET from Terminal
sudo apt-get install dmg2img
sudo yum install dmg2img
De-compress Catalina DMG with DMG2IMG.
Then restore the uncompressed image to USB.
Change the variables below as you need (Warning: The following is just an example, do not copy and paste).
sudo dmg2img -v -i /path/to/'Niresh-Catalina.dmg' -o /path/to/Niresh-Catalina-Uncompressed.dmg
sudo dd if=/path/to/Niresh-Catalina-Uncompressed.dmg of=/dev/sdb bs=1M
- Prepare for installation
Unplug all USB connected devices from your computer before you begin the setup (except your keyboard and mouse.). A faulty external USB hard drive can cause your Hackintosh boot loader to hang on startup.
Open up your computer and unplug any extra internal hard drives that your computer has, besides the hard drive that you are installing macOS on. (Just unplug the hard drive SATA cables from your motherboard.)
Remove any unnecessary PCI Cards and Hardware (You can plug them later.)
- Set up your motherboard’s BIOS/Setup for Catalina.
Essentially, the BIOS (or UEFI) is the settings page for your computer’s motherboard. From there, you can fiddle with how your computer hardware works.
It is often necessary to change a few basic settings in the BIOS or UEFI to get macOS up and running. The BIOS standard is generally used by motherboards from before 2012, while the UEFI standard is used by motherboards made after that. Niresh Catalina only supports UEFI -based BIOS.
To access BIOS/UEFI Setup, press and hold DELETE button on the Keyboard while the system is booting up. (They key may vary from computer to computer. It can be ESC, F2, F8, F10... You have to find out how yours works)
Load Optimized Defaults.
Set USB drive to the highest boot priority.
If your CPU supports VT-d, disable it.
Disable CFG-Lock.
Disable Secure Boot Mode
If your system has OS Type, set it to Other OS.
Save and exit.
Read more about Configuring UEFI BIOS for a Hackintosh here.
- Boot into Hackintosh Catalina
Plug in your Niresh Catalina USB drive and restart your computer. If things go well, your computer will boot from the USB drive instead of booting from your normal hard disk. You will then be able to view the Niresh Catalina clover boot loader menu.
If you do not manage to reach the Niresh Catalina menu, check your motherboard’s BIOS settings to make sure that the changes you made were properly applied. If they were, but you still cannot boot from the Niresh Catalina USB drive, unplug your USB drive, and go back to Step 4. Reformat your USB drive with Disk Utility and try again. If all else fails, try using a different USB drive for Niresh Catalina or simply another USB port.

At the Hackintosh Catalina menu, press the enter key (or return key) to start the mac os Catalina installer. The installer screen will take several minutes to load.
In the worst case scenarios, instead of loading the Mac OS installer, you may end up at a dark gray screen that tells you to restart your computer (a kernel panic), or you may end up with a small crossed-out sign (a loading error). If you get a kernel panic/loading error (or if the Mac OS installer simply won’t start within 10 minutes), you’ll need to enter some boot flags. To enter boot flags, manually restart your computer by pressing your computer’s power button. Then, once you’ve booted back into the Hackintosh Catalina menu, try typing any necessary boot flags before pressing the enter/return key. Check out our list of common boot flags and our guide to fixing boot problems with verbose mode for reference.
- Install Hackintosh Catalina
Once you’ve entered the macOS Catalina installer, you will come up to a hard disk selection page. This is where you choose where you want to install Catalina.
If you’re installing Catalina on a computer that has never been turned into a Hackintosh before (i.e. doesn’t already have Mojave, High Sierra, Sierra, or El Capitan installed), there won’t be any hard disk options to select. We’ll have to fix that. To do this, start up Disk Utility, which is located under the Utilities menu in the top bar.

You need to use Disk Utility to erase a hard drive partition so that macOS Catalina can install itself on it. In the sidebar of Disk Utility, choose the hard drive partition where you want Catalina installed, and erase it by using the “Erase” tab. You can also just erase the entire hard drive. In the screenshot below, my hard drive partition is called “Macintosh HD”, while my entire hard drive is called “Apple SSD macOS-0 SSD Media”.

When erasing, the format should be set to “APFS” & Scheme to “GUID Partition Scheme”. You can also partition the hard disk by using Disk Utility’s Partition tab.
Now, you may close the Disk Utility app. Here is where I will save you from facing the "osinstall.postscript.pkg error". Open the Terminal app, in the Utilities section also. Update the system date/time to the current UTC international time by typing
"date 0507141620"
for May, 7th of 2020 at 14:16 UTC, for instance, where date is in the [mm][dd][HH][MM][yy] format, which is [Month][Date][Hour][Minute][Year] without any separation.On the installation page for macOS, the hard disk/disk partition should now be showing up. Select it, and then click the “Customize” button on the bottom left. This is where using a distro becomes really useful: Catalina Zone allows you to install extra Hackintosh drivers and kexts, straight from the macOS Catalina installer.
However, choosing the right options from this page can be really tricky, so unless you’re absolutely certain about which drivers and kexts you need to install for your computer, I don’t recommend installing too much stuff from here. The default selection will enable macOS to boot from the hard drive without any assistance, and automatically enable audio and ethernet. For most computers, that will be enough.
If your computer already has macOS installed and you are simply updating it to Catalina, you can just uncheck all of these options. macOS treats Catalina as just another update, there’s no need to reinstall all of your kexts and drivers.
Once you’re done with the “Customize” page, install Catalina. This will take at least 30 minutes. Voilà.


Pretty great post. I simply stumbled upon your blog and wanted to mention that I have really loved surfing around your blog posts. Great set of tips from the master himself. Excellent ideas. Thanks for Awesome tips Keep it
ReplyDeletetransmac-crack
cerbero-suite-advanced-crack
presonus-studio-one-pro-crack
passfab-for-rar-crack
minitab-crack
imindmap-pro-crack
backup4all-pro-crack
vstpatch.net
ReplyDeleteEaseUS Partition Master Crack
GBWhatsApp Apk Crack
WhatsApp Plus Crack Apk
OmniFocus Pro Crack
SoundGrid Rack For VENUE Crack
Wow, amazing block structure! How long
Have you written a blog before? Working on a blog seems easy.
The overview of your website is pretty good, not to mention what it does.
In the content!
Wow, amazing block structure! How long
ReplyDeleteHave you written a blog before? Working on a blog seems easy.
The overview of your website is pretty good, not to mention what it does.
In the content!
vstpatch.net
MacX DVD Ripper Pro Crack
PreSonus Studio One Pro Crack
DaVinci Resolve Studio Crack
Garritan CFX Concert Grand Crack
Sound Forge Pro Crack
Wow, amazing block structure! How long
ReplyDeleteHave you written a blog before? Working on a blog seems easy.
The overview of your website is pretty good, not to mention what it does.
In the content!
Bandicam Pro 5.3.3.1895 Crack
I am very impressed with your post because this post is very beneficial for and provides new knowledge to me. Thanks for sharing.
ReplyDeleteTransMac 14.4 Crack
I am very impressed with your post because this post is very beneficial for me and provide a new knowledge…
ReplyDeletecerbero-suite-advanced-crack
mixpad-crack
editplus-crack
airmail-crack
camtasia-studio-crack
explorermax-crack
aquasoft-slideshow-ultimate-crack
pichon-crack
presonus-studio-one-pro-crack
I like your all post. You have done really good work.
ReplyDeleteThank you for the information you provide, it helped me a lot.
I hope to have many more entries or so from you.
Please also visit my website and tell us what you think.
Great work with the hard work you have done I appreciate your work thanks for sharing it.
IMyFone D-Back Crack
Amazing blog! I really like the way you explained such information about this post with us.
ReplyDeleteAnd blog is really helpful for us this website
I hope to have many more entries or so from you.
Please also visit my website and tell us what you think.
Great work with the hard work you have done I appreciate your work thanks for sharing it.
Full Version Softwares Free Download
IMyFone D-Back Crack
I like your all post. You have done really good work. Thank you for the information you provide, it helped me a lot. I hope to have many more entries or so from you.
ReplyDeleteVery interesting blog.
TransMac Crack
Ardamax Keylogger Crack
Wondershare DVD Creator Crack
I like your all post. You have done really good work. Thank you for the information you provide, it helped me a lot. You can Latest Software Crack Free Download With Activation Key, Serial Key & Keygen I hope to have many more entries or so from you. Download Crack Softwares Free Download
ReplyDeletefull latest version 2022 blog.
PreSonus Notion Crack
CLA-76 Compressor Crack
Ozone Imager Crack
1Keyboard Crack
4Front TruePianos Latest VST Crack
CloneBD Crack
I guess I am the only one who comes here to share my very own experience guess what? I am using my laptop for almost the post 2 years.
ReplyDeleteOmniFocus Pro Crack
Auslogics Driver Updater Crack
After looking through a few blog articles on your website,
ReplyDeletewe sincerely appreciate the way you blogged.
TransMac Crack
Bartender Crack
Aiseesoft FoneLab Crack
I like your all post. You have done really good work. Thank you for the information you provide, it helped me a lot.
ReplyDelete4K Video Downloader Crack
MiniTool Partition Wizard Crack
TransMac Crack
Then check the number of blog posts on your site.
ReplyDeleteThanks for your blog.
We've added this list to your favorites list, which we're currently reviewing.
Also ,check out our Burrito website and let us know what you think.
Thank you very much for your work and thank you for sharing.
windows8ny Full Version Softwares Free
Active Disk Image Crack
Appreciation is a wonderful thing...thanks for sharing keep it up.GOM Player Plus Crack
ReplyDeleteIObit Malware Fighter Pro Crack
EASEUS Partition Master Crack
AOMEI Backupper Pro Crack
MakeMKV Crack
its Amazing and good post keep it up
ReplyDeleteBitRecover EML Converter Wizard Crack
iMyFone D-Back Crack
Scanahand Premium Edition Crack
WinCam Crack
Thank you so much for letting me express my feeling about your post.
ReplyDeleteYou write every blog post so well. Keep the hard work going and good luck.
Hope to see such beneficial post ahead to.
Active Disk Image Pro Crack
Tutorials >>>>> Download Now
ReplyDelete>>>>> Download Full
Tutorials >>>>> Download LINK
>>>>> Download Now
Tutorials >>>>> Download Full
>>>>> Download LINK 5X
I'm really impressed with your writing skills, as smart as the structure of your weblog.
ReplyDeleteDriverMax Pro Crack
MiniTool Power Data Recovery Crack
Hide My IP Crack
TransMac Crack
up4crack.net
I like your all post. You have done really good work. Thank you for the information you provide, it helped me a lot. I hope to have many more entries or so from you.
ReplyDeleteVery interesting blog.
howcrack.org
SlimWare Driver Update Crack
Nice information. Thanks for sharing content and such nice information for me. I hope you will share some more content about. Please keep sharing
ReplyDeleteAOMEI Partition Assistant Crack
MiniTool Partition Wizard Crack
Easeus Partition Master 2022 Crack
Auslogics Driver Updater Crack
Download Software for PC & Mac
ReplyDeleteAppreciable Article, You have done really good work. Thank you for the information you provide, it helped me a lot.
Netcut Crack
IceCream Screen Recorder Crack
Adobe After Effects Crack
Lansweeper Crack
Boom 3D Crack
Tvpaint Crack
Loaris Trojan Remover Crack
Rhinoceros Crack